by Allyson Haas
While the rest of the country enjoys the summer months, reveling in the magic of what is commonly referred to as “camp” (read: craft
projects, popsicles, s'mores, lanyard, friendship bracelets, color war); here in
the City of Angels, the dog days of summer is when preschool begins.
If you're not yet familiar with the nightmare it is just to get into one of these educational havens, take a minute to read this...and this... and this. Welcome back; hopefully you're not too traumatized to continue reading. Now, where was I?
Perhaps even more exclusive than an acceptance letter from your
first choice preschool is the school’s unofficial welcome; the inaugural kid’s
birthday party invite. Thankfully, C’s magical wonderland of a nursery school
has an all inclusive policy: invite the whole class, or don't have a party.
This is amazing for two reasons: one, there's nothing I enjoy more than making folks feel welcomed, and two, I LOVE a good birthday party.
Admittedly, when it’s C’s turn to shine, I might throw a bit too much
sunshine and glitter around, but last time I checked it's not illegal to be enthusiastic. There's nothing like a great invitation to set the mood for a party and give
the recipient some sort of idea of what to expect.
I’m also a crazy DIMer
(Do it Myself-er). While I recognize the need to pay people to do things I’m
terrible at (read: anything involving technology), it pains me no end to pay
people to do something I can actually make myself. In other words, I'm cheap. I don’t
buy C expensive clothes unless sourced from the local secondhand kids’ shop, and I simply refuse to pay an exorbitant amount of money for something that's ultimately going to end up in the garbage.
In the vein of getting the most bang for your buck, I'm sharing with you the how-to for creating invitations both good looking and cheap. Which, hopefully, is not how the Haasband described me to his friends before we got married.
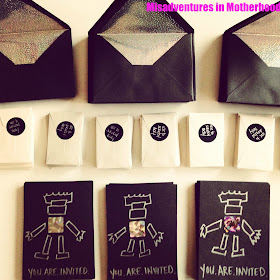
1. Choose a theme. Ever since C started requesting I draw robots on his chalkboard
wall (shortly after his train birthday last year), I knew I had my theme.
2. Make it stand out. Try using a non-traditional element. In this digital day and age that could
mean something as simple as an actual paper invitation, sent in the actual mail
and delivered by an actual postman or woman. I did that in this case, but I
also added a scratch-off element. A hologram sticker that revealed a secret
message.
3. Personalize it. Add an element that makes the recipient feel like you did
something just for them. Write a note, hand draw something, or get inventive with
the addressing. For this one, I hand drew the robot on each and every invite.
Very haphazard, but the overall effect was achieved.
4. Kick it up a notch Take one final look at the whole shebang and see what you
can do to add more “money on the screen”, as they say in the film biz. In this
instance, I added a small envelope with a spare robot part inside (a washer purchased
in bulk from the hardware store) with a handwritten sticker so the
recipient knew that the hologram sticker was, in fact, meant to be scratched-off.
5. Add a philanthropic element Forgo gifts for the birthday boy or girl and instead seek either book
donations for local public school libraries in need (what we opted with this
year), make a donation to a charity close to your family’s heart, or check in
with the Ronald McDonald House Charities to see what they currently need. Request those items in lieu of gifts. The possibilities are endless here, as
there are so many great organizations in need of a little help. And what better
way to teach your child how to affect change than to ACTUALLY do so. I’m all about that.
6. Put a stamp on it. Go the extra mile and see if the local post office has a
stamp that fits your theme. For Caleb's first Rock Star birthday, I got Johnny Cash
stamps. His second I did trains. Sadly this time around, there wasn’t a robot
stamp, so I just chose the "From Me to You" stamp.
7. Admire your handiwork. I'm all about giving oneself a pat on the back (or a toast with a glass of great bubbly) but don’t dither too long, or you’ll miss the one month advance notice window and no one will be able to come because
they already committed to some other kid's party.
8. Back pedal (optional). Realize you forgot a key piece of information on the
invite (like maybe how to RSVP)? Make up for it by sending an on-theme email. In this case,
my email was titled System Error.
9. Take a Xanax when you realize you have to do this all over again with the
thank you notes
Total time spent: 5 days
Total money spent: $84
And in case your child’s fancy doesn’t include intelligence
of the artificial sort, below are some pictures of the invites from birthdays 1
and 2. Yep, I’m that mom.


No comments:
Post a Comment